Thursday, December 2, 2021

Git - Stash Operation

 Suppose you are implementing a new feature for your product. Your code is in progress and suddenly a customer escalation comes. Because of this, you have to keep aside your new feature work for a few hours. You cannot commit your partial code and also cannot throw away your changes. So you need some temporary space, where you can store your partial changes and later on commit it.

In Git, the stash operation takes your modified tracked files, stages changes, and saves them on a stack of unfinished changes that you can reapply at any time.

[jerry@CentOS project]$ git status -s
M string.c
?? string

Now, you want to switch branches for customer escalation, but you don’t want to commit what you’ve been working on yet; so you’ll stash the changes. To push a new stash onto your stack, run the git stash command.

[jerry@CentOS project]$ git stash
Saved working directory and index state WIP on master: e86f062 Added my_strcpy function
HEAD is now at e86f062 Added my_strcpy function

Now, your working directory is clean and all the changes are saved on a stack. Let us verify it with the git status command.

[jerry@CentOS project]$ git status -s
?? string

Now you can safely switch the branch and work elsewhere. We can view a list of stashed changes by using the git stash list command.

[jerry@CentOS project]$ git stash list
stash@{0}: WIP on master: e86f062 Added my_strcpy function

Suppose you have resolved the customer escalation and you are back on your new feature looking for your half-done code, just execute the git stash pop command, to remove the changes from the stack and place them in the current working directory.

Git - Push Operation

 Jerry modified his last commit by using the amend operation and he is ready to push the changes. The Push operation stores data permanently to the Git repository. After a successful push operation, other developers can see Jerry’s changes.

He executes the git log command to view the commit details.

[jerry@CentOS project]$ git log

The above command will produce the following result:

commit d1e19d316224cddc437e3ed34ec3c931ad803958
Author: Jerry Mouse <jerry@gmail.com>
Date: Wed Sep 11 08:05:26 2013 +0530

Changed return type of my_strlen to size_t

Before push operation, he wants to review his changes, so he uses the git show command to review his changes.

[jerry@CentOS project]$ git show d1e19d316224cddc437e3ed34ec3c931ad803958

The above command will produce the following result:

commit d1e19d316224cddc437e3ed34ec3c931ad803958
Author: Jerry Mouse <jerry@gmail.com>
Date: Wed Sep 11 08:05:26 2013 +0530

Changed return type of my_strlen to size_t

diff --git a/string.c b/string.c
new file mode 100644
index 0000000..7da2992
--- /dev/null
+++ b/string.c
@@ -0,0 +1,24 @@
+#include <stdio.h>
+
+size_t my_strlen(char *s)
+
{
   +
   char *p = s;
   +
   +
   while (*p)
   + ++p;
   + return (p -s );
   +
}
+
+int main(void)
+
{
   + int i;
   + char *s[] = 
   {
      + "Git tutorials",
      + "Tutorials Point"
      +
   };
   +
   +
   +
   for (i = 0; i < 2; ++i)
   printf("string lenght of %s = %lu\n", s[i], my_strlen(s[i]));
   +
   +
   return 0;
   +
}

Jerry is happy with his changes and he is ready to push his changes.

[jerry@CentOS project]$ git push origin master

The above command will produce the following result:

Counting objects: 4, done.
Compressing objects: 100% (3/3), done.
Writing objects: 100% (3/3), 517 bytes, done.
Total 3 (delta 0), reused 0 (delta 0)
To gituser@git.server.com:project.git
19ae206..d1e19d3 master −> master

Jerry’s changes have been successfully pushed to the repository; now other developers can view his changes by performing clone or update operation.

Git - Commit Changes

 Jerry has already committed the changes and he wants to correct his last commit. In this case, git amend operation will help. The amend operation changes the last commit including your commit message; it creates a new commit ID.

Before amend operation, he checks the commit log.

[jerry@CentOS project]$ git log

The above command will produce the following result.

commit cbe1249b140dad24b2c35b15cc7e26a6f02d2277
Author: Jerry Mouse <jerry@gmail.com>
Date: Wed Sep 11 08:05:26 2013 +0530

Implemented my_strlen function


commit 19ae20683fc460db7d127cf201a1429523b0e319
Author: Tom Cat <tom@gmail.com>
Date: Wed Sep 11 07:32:56 2013 +0530

Initial commit

Jerry commits the new changes with -- amend operation and views the commit log.

[jerry@CentOS project]$ git status -s
M string.c
?? string

[jerry@CentOS project]$ git add string.c

[jerry@CentOS project]$ git status -s
M string.c
?? string

[jerry@CentOS project]$ git commit --amend -m 'Changed return type of my_strlen to size_t'
[master d1e19d3] Changed return type of my_strlen to size_t
1 files changed, 24 insertions(+), 0 deletions(-)
create mode 100644 string.c

Now, git log will show new commit message with new commit ID −

[jerry@CentOS project]$ git log

The above command will produce the following result.

commit d1e19d316224cddc437e3ed34ec3c931ad803958
Author: Jerry Mouse <jerry@gmail.com>
Date: Wed Sep 11 08:05:26 2013 +0530

Changed return type of my_strlen to size_t


commit 19ae20683fc460db7d127cf201a1429523b0e319
Author: Tom Cat <tom@gmail.com>
Date: Wed Sep 11 07:32:56 2013 +0530

Initial commit

Git - Perform Changes

Jerry clones the repository and decides to implement basic string operations. So he creates string.c file. After adding the contents, string.c will look like as follows −

#include <stdio.h>

int my_strlen(char *s)
{
   char *p = s;

   while (*p)
      ++p;

   return (p - s);
}

int main(void)
{
   int i;
   char *s[] = 
   {
      "Git tutorials",
      "Tutorials Point"
   };

   for (i = 0; i < 2; ++i)
      
   printf("string lenght of %s = %d\n", s[i], my_strlen(s[i]));

   return 0;
}

He compiled and tested his code and everything is working fine. Now, he can safely add these changes to the repository.

Git add operation adds file to the staging area.

[jerry@CentOS project]$ git status -s
?? string
?? string.c

[jerry@CentOS project]$ git add string.c

Git is showing a question mark before file names. Obviously, these files are not a part of Git, and that is why Git does not know what to do with these files. That is why, Git is showing a question mark before file names.

Jerry has added the file to the stash area, git status command will show files present in the staging area.

[jerry@CentOS project]$ git status -s
A string.c
?? string

To commit the changes, he used the git commit command followed by –m option. If we omit –m option. Git will open a text editor where we can write multiline commit message.

[jerry@CentOS project]$ git commit -m 'Implemented my_strlen function'

The above command will produce the following result −

[master cbe1249] Implemented my_strlen function
1 files changed, 24 insertions(+), 0 deletions(-)
create mode 100644 string.c

After commit to view log details, he runs the git log command. It will display the information of all the commits with their commit ID, commit author, commit date and SHA-1 hash of commit.

[jerry@CentOS project]$ git log

The above command will produce the following result −

commit cbe1249b140dad24b2c35b15cc7e26a6f02d2277
Author: Abid Moon <abidmoon@gmail.com>
Date: Wed Sep 11 08:05:26 2013 +0530

Implemented my_strlen function


commit 19ae20683fc460db7d127cf201a1429523b0e319
Author: afreen <afreen@gmail.com>
Date: Wed Sep 11 07:32:56 2013 +0530

Initial commit

Git - Clone Operation

 We have a bare repository on the Git server and Tom also pushed his first version. Now, Jerry can view his changes. The Clone operation creates an instance of the remote repository.

Jerry creates a new directory in his home directory and performs the clone operation.

[jerry@CentOS ~]$ mkdir jerry_repo

[jerry@CentOS ~]$ cd jerry_repo/

[jerry@CentOS jerry_repo]$ git clone gituser@git.server.com:project.git

The above command will produce the following result.

Initialized empty Git repository in /home/jerry/jerry_repo/project/.git/
remote: Counting objects: 3, done.
Receiving objects: 100% (3/3), 241 bytes, done.
remote: Total 3 (delta 0), reused 0 (delta 0)

Jerry changes the directory to new local repository and lists its directory contents.

[jerry@CentOS jerry_repo]$ cd project/

[jerry@CentOS jerry_repo]$ ls

Git - Create Operation

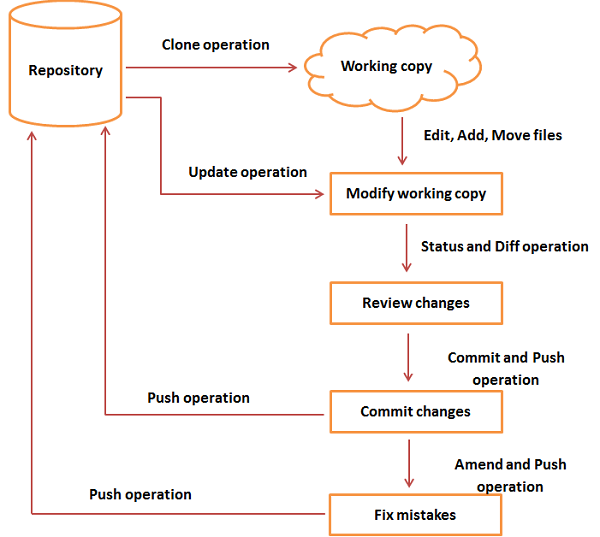
 In this chapter, we will see how to create a remote Git repository; from now on, we will refer to it as Git Server. We need a Git server to allow team collaboration.

Create New User

# add new group
[root@CentOS ~]# groupadd dev

# add new user
[root@CentOS ~]# useradd -G devs -d /home/gituser -m -s /bin/bash gituser

# change password
[root@CentOS ~]# passwd gituser

The above command will produce the following result.

Changing password for user gituser.
New password:
Retype new password:
passwd: all authentication token updated successfully.

Create a Bare Repository

Let us initialize a new repository by using init command followed by --bare option. It initializes the repository without a working directory. By convention, the bare repository must be named as .git.

[gituser@CentOS ~]$ pwd
/home/gituser

[gituser@CentOS ~]$ mkdir project.git

[gituser@CentOS ~]$ cd project.git/

[gituser@CentOS project.git]$ ls

[gituser@CentOS project.git]$ git --bare init
Initialized empty Git repository in /home/gituser-m/project.git/

[gituser@CentOS project.git]$ ls
branches config description HEAD hooks info objects refs

Generate Public/Private RSA Key Pair

Let us walk through the process of configuring a Git server, ssh-keygen utility generates public/private RSA key pair, that we will use for user authentication.

Open a terminal and enter the following command and just press enter for each input. After successful completion, it will create a .ssh directory inside the home directory.

tom@CentOS ~]$ pwd
/home/tom

[tom@CentOS ~]$ ssh-keygen

The above command will produce the following result.

Generating public/private rsa key pair.
Enter file in which to save the key (/home/tom/.ssh/id_rsa): Press Enter Only
Created directory '/home/tom/.ssh'.
Enter passphrase (empty for no passphrase): ---------------> Press Enter Only
Enter same passphrase again: ------------------------------> Press Enter Only
Your identification has been saved in /home/tom/.ssh/id_rsa.
Your public key has been saved in /home/tom/.ssh/id_rsa.pub.
The key fingerprint is:
df:93:8c:a1:b8:b7:67:69:3a:1f:65:e8:0e:e9:25:a1 tom@CentOS
The key's randomart image is:
+--[ RSA 2048]----+
| |
| |
| |
|
.
|
| Soo |
| o*B. |
| E = *.= |
| oo==. . |
| ..+Oo
|
+-----------------+

ssh-keygen has generated two keys, first one is private (i.e., id_rsa) and the second one is public (i.e., id_rsa.pub).

Note: Never share your PRIVATE KEY with others.

Adding Keys to authorized_keys

Suppose there are two developers working on a project, namely Tom and Jerry. Both users have generated public keys. Let us see how to use these keys for authentication.

Tom added his public key to the server by using ssh-copy-id command as given below −

[tom@CentOS ~]$ pwd
/home/tom

[tom@CentOS ~]$ ssh-copy-id -i ~/.ssh/id_rsa.pub gituser@git.server.com

The above command will produce the following result.

gituser@git.server.com's password:
Now try logging into the machine, with "ssh 'gituser@git.server.com'", and check in:
.ssh/authorized_keys
to make sure we haven't added extra keys that you weren't expecting.

Similarly, Jerry added his public key to the server by using ssh-copy-id command.

[jerry@CentOS ~]$ pwd
/home/jerry

[jerry@CentOS ~]$ ssh-copy-id -i ~/.ssh/id_rsa gituser@git.server.com

The above command will produce the following result.

gituser@git.server.com's password:
Now try logging into the machine, with "ssh 'gituser@git.server.com'", and check in:
.ssh/authorized_keys
to make sure we haven't added extra keys that you weren't expecting.

Push Changes to the Repository

We have created a bare repository on the server and allowed access for two users. From now on, Tom and Jerry can push their changes to the repository by adding it as a remote.

Git init command creates .git directory to store metadata about the repository every time it reads the configuration from the .git/config file.

Tom creates a new directory, adds README file, and commits his change as initial commit. After commit, he verifies the commit message by running the git log command.

[tom@CentOS ~]$ pwd
/home/tom

[tom@CentOS ~]$ mkdir tom_repo

[tom@CentOS ~]$ cd tom_repo/

[tom@CentOS tom_repo]$ git init
Initialized empty Git repository in /home/tom/tom_repo/.git/

[tom@CentOS tom_repo]$ echo 'TODO: Add contents for README' > README

[tom@CentOS tom_repo]$ git status -s
?? README

[tom@CentOS tom_repo]$ git add .

[tom@CentOS tom_repo]$ git status -s
A README

[tom@CentOS tom_repo]$ git commit -m 'Initial commit'

The above command will produce the following result.

[master (root-commit) 19ae206] Initial commit
1 files changed, 1 insertions(+), 0 deletions(-)
create mode 100644 README

Tom checks the log message by executing the git log command.

[tom@CentOS tom_repo]$ git log

The above command will produce the following result.

commit 19ae20683fc460db7d127cf201a1429523b0e319
Author: Tom Cat <tom@tutorialspoint.com>
Date: Wed Sep 11 07:32:56 2013 +0530

Initial commit

Tom committed his changes to the local repository. Now, it’s time to push the changes to the remote repository. But before that, we have to add the repository as a remote, this is a one-time operation. After this, he can safely push the changes to the remote repository.

Note − By default, Git pushes only to matching branches: For every branch that exists on the local side, the remote side is updated if a branch with the same name already exists there. In our tutorials, every time we push changes to the origin master branch, use appropriate branch name according to your requirement.

[tom@CentOS tom_repo]$ git remote add origin gituser@git.server.com:project.git

[tom@CentOS tom_repo]$ git push origin master

The above command will produce the following result.

Counting objects: 3, done.
Writing objects: 100% (3/3), 242 bytes, done.
Total 3 (delta 0), reused 0 (delta 0)
To gituser@git.server.com:project.git
* [new branch]
master −> master

Git - Life Cycle

 In this chapter, we will discuss the life cycle of Git. In later chapters, we will cover the Git commands for each operation.

General workflow is as follows −

  • You clone the Git repository as a working copy.

  • You modify the working copy by adding/editing files.

  • If necessary, you also update the working copy by taking other developer's changes.

  • You review the changes before commit.

  • You commit changes. If everything is fine, then you push the changes to the repository.

  • After committing, if you realize something is wrong, then you correct the last commit and push the changes to the repository.

Shown below is the pictorial representation of the work-flow.

Git Tutorial

GIT USEFUL COMMANDS

  Basic Git Commands In this section, you will learn the essential Git commands. These basic Git commands are the foundation to learn more a...